“Wow, you have really white teeth!” Yeah, I actually hear that one a lot. No, my teeth are not bright shining white like on TV, where people either have chemically whitened or photoshopped white teeth. But mine are a little whiter than the average person’s. I am super excited to share with you my method to whiten teeth naturally – and for very low cost!
Disclaimer: This post contains affiliate links. See my Disclosure Policy for more information.
About a year after I found my natural toothpaste alternative, I started thinking that I wished I had whiter teeth. As a teenager I had tried the Crest tooth whitening strips and gels that you paint on your teeth and let sit on your teeth for 5 or 10 minutes. It tasted awful, worked only marginally well, and contained ingredients that I did not care to put on my body or in my mouth.
I did some research, and found one of the most natural things could be effective at whitening teeth: activated charcoal.

How does activated charcoal whiten teeth?
Activated charcoal is adsorptive – that means that substances which come in contact with the activated charcoal stick to it, and can be flushed away with the charcoal. Things like coffee, tea, and other stains on teeth essentially get stuck to the charcoal. Which means those stains are no longer stuck to your teeth. So you get whiter teeth!
How do you apply the charcoal?
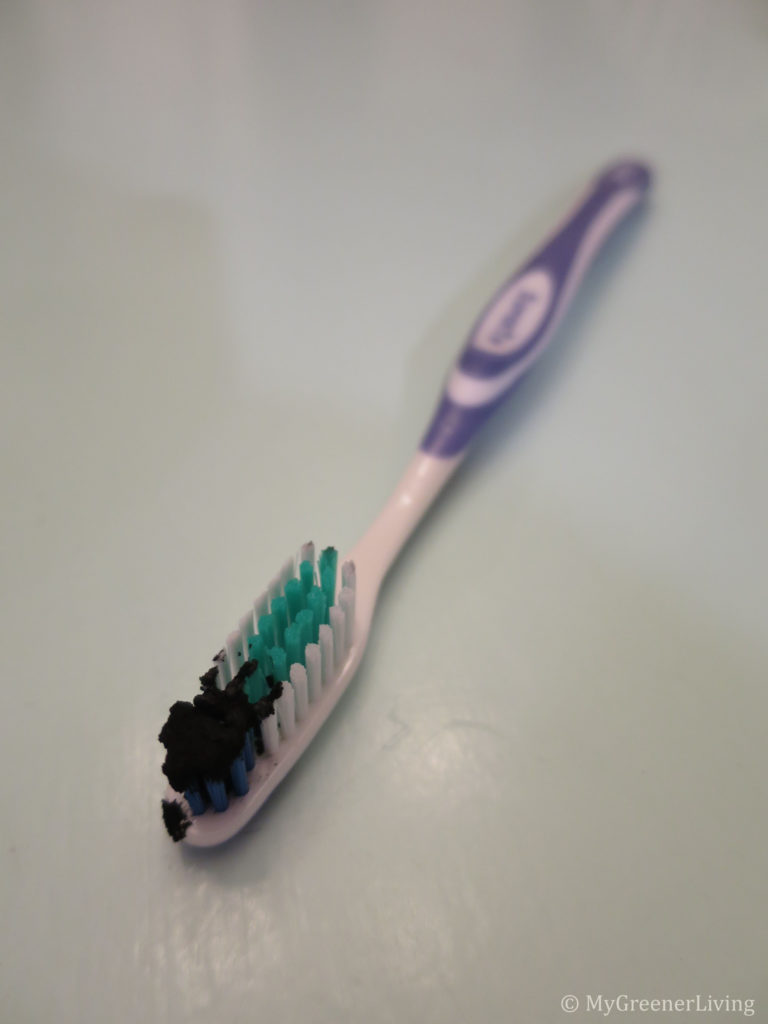
Direct application
There are multiple ways that I have applied charcoal to whiten my teeth. The first method I tried involved poring small amount of charcoal powder into a small bowl, adding one drop of water at a time, blending to form a thick paste, and using my finger to coat my teeth. Then letting sit for a few minutes. This was messy and tricky – my lips and fingers ended up with charcoal stains in the creases, and I couldn’t always get the charcoal to stick to my teeth.
Charcoal as a “tooth paste”
One day I got lazy. I wanted to whiten my teeth but didn’t want the messiness of my “direct application” method. I wet my toothbrush, dipped the end in the activated charcoal powder, and brushed my teeth. It worked! I found this to be an effective way to spread the charcoal over my teeth in an easy and less messy way!
I typically brush my teeth with charcoal between nightly and every other night. I have gone about a week between brushings and haven’t noticed a drastic different, so my minimum is 1 time per week.
My bonus trick
I notice a difference in tooth whiteness from immediately before to immediately after brushing with charcoal. So if I have a special event to attend, like a wedding, I make sure to brush my teeth with charcoal before I leave the house.
Staining caution
I have noticed that the charcoal tends to stick to dry skin, whether that be dry skin around my fingernails, dry skin on my lips, or on my face around my lips. I can usually wipe it off with my hand or a wash cloth, but in the winter when my lips got very dry, they would stay slightly stained (which is why I brushed with charcoal at night instead of in the morning). My quick tip to prevent this sticking is to apply chapstick to my lips before brushing, and apply moisturizer to my face and hands before handling. (My homemade chapstick and moisturizers are my favorites!)
Does it work?
In my opinion, absolutely YES! Activated charcoal has been effective at whitening my teeth. I tried getting before and after pictures, but lighting differences was enough to make my pictures look the same. But, I thought my teeth were whiter, and my family and friends did too! In fact, when my friend asked what I was going to be writing about next and I told him about this, he asked to see my teeth. I gave him a big smile and he was surprised that I really did have white teeth!
I love how simple and inexpensive it is to get white teeth!
Cost
I buy activated charcoal by the 1 lb bag on Amazon. At the time of writing, it costs about $22. In 6 months of brushing with charcoal almost daily, I have used about 1/2 oz. At this rate the bag will last me about 16 years, or $22/16=$1.38 per year. Compared to 2-4 week treatments that cost $20-$40+ and are temporary, this is a fantastic deal. Plus, all natural and safe!
If you want to try charcoal for tooth whitening but don’t want to buy a pound of charcoal, you can buy activated charcoal capsules and open individual capsules into a small bowl to use for brushing. I started out with a bottle of activated charcoal capsules. When I realized that I liked regularly brushing with charcoal, and was tired of opening capsules, I switched over to the bag of charcoal. These capsules are about $7 for 100 capsules, which I estimate to be good for 200 brushings. This is easily a year supply for only $7. Still a great price!
Do you have any other uses for charcoal? Please share in the comments below!