Summer time means lots of great things, including cookouts and burgers. As a vegetarian, I enjoy the side dishes and desserts brought to cookouts, but sometimes I want to be included in the main course. Store bought veggie burgers are easy, but I rarely find them satisfying. So I set out to find a delicious and nutritious veggie bean burger recipe! Per my usual, nothing I found quite suited my preferences, so I took inspiration from several other recipes and made my own.

Disclaimer: This post contains affiliate links. See my Disclosure Policy for more information.
In case you’re wondering, as a vegetarian:
- No, I do not miss meat
- No, I do not “wish” I could eat a burger or hot dog (as an adult, I can choose to eat whatever I want and I choose not to eat those things)
- No, I do not want my vegetarian food to look or taste like meat
- Yes, I do sometimes want a “main course” offering that I can dress up with all of the regular condiments that are found a a cookout!
So, this veggie black bean burger can be formed into roughly the same shape as a beef burger for ease of cooking, it can be adorned with the same condiments, but it otherwise looks nothing like a meat burger patty and tastes nothing like a beef patty.
These veggie bean burgers take about an hour to prep (using mostly fresh veggies that require chopping), but the recipe makes a big batch that lasts me most of the summer/grilling season.
My recipe has a strong basis in Ambitious Kitchen’s Meatless Black Bean Loaf. Thanks, Monique, for the inspiration!
Veggie bean burger ingredients
- 2 cans black beans, or about 3.5 cups cooked beans, rinsed and drained
- 2 eggs
- 1 bell pepper (130 grams, ~3/4 cups), diced
- 3/4 cup corn kernels (95 grams)
- 1 small-medium onion (100 grams, ~ 2/3 cups), diced
- 3 cloves garlic, minced
- 1/2 cup grated carrot (45 grams, about 1 carrot)
- 1 teaspoon olive oil
- 1 teaspoon salt
- 1 teaspoon dried oregano
- 1 teaspoon cumin
- 2 teaspoons chili powder
- 1 pinch (~1/32 teaspoon) cayenne powder
- 1/8 teaspoon black pepper
- 1 cup breadcrumbs (sourdough gives a great taste!)

Instructions
- Place a large pan on the stove on medium heat. Add olive oil. Add onions, and cook until it starts becoming translucent.
- Add peppers, garlic, and carrots to the fry pan. Cook until vegetables are softened and onions are transparent.
- Transfer veggies to a large bowl. Add spices and mix.
- Preheat an oven to 350°F.
- Using a blender or food processor, blend 1 can of black beans until mostly smooth. Transfer the pureed beans and other can of beans into the bowl with the veggies.
- Add the corn, breadcrumbs, and eggs to the bowl. Mix all ingredients together.
- Line a baking sheet with parchment paper or a silicone baking mat (number 5 in my list of favorite kitchen gadgets!).
- Form veggie bean burger balls, flatten to a burger patty shape, and place on the baking sheet. I used a 1/3 cup measuring cup to scoop out batter, and ended up with 14 patties.
- Bake at 350°F for about 18 minutes.
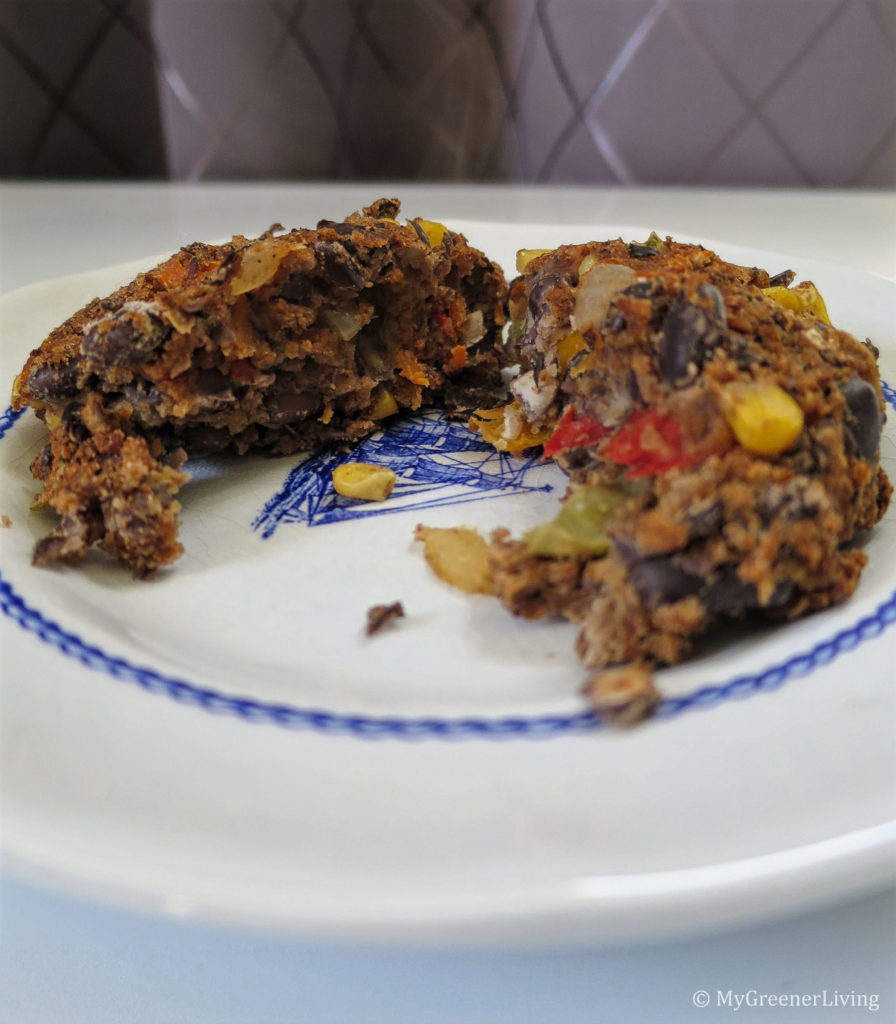
The burgers should have a slight crunchy layer on the outside, and stay moist but fully cooked on the inside.
Like all homemade veggie or bean burgers that I have tried, these tend to crumble more than a store bought veggie burger or beef burger, so they can be difficult to eat on a bun. I usually eat my bean burgers with a fork.

Veggie Bean Burger
Ingredients
- 2 cans black beans or about 3.5 cups cooked beans, rinsed and drained
- 2 eggs
- 1 bell pepper 130 grams, ~3/4 cups, diced
- 3/4 cup corn kernels 95 grams
- 1 small-medium onion 100 grams, ~ 2/3 cups, diced
- 3 cloves garlic minced
- 1/2 cup grated carrot 45 grams, about 1 carrot
- 1 teaspoon olive oil
- 1 teaspoon salt
- 1 teaspoon dried oregano
- 1 teaspoon cumin
- 2 teaspoons chili powder
- 1 pinch ~1/32 teaspoon cayenne powder
- 1/8 teaspoon black pepper
- 1 cup breadcrumbs sourdough gives a great taste!
Instructions
- Place a large pan on the stove on medium heat. Add olive oil. Add onions, and cook until it starts becoming translucent.
- Add peppers, garlic, and carrots to the fry pan. Cook until vegetables are softened and onions are transparent.
- Transfer veggies to a large bowl. Add spices and mix.
- Preheat an oven to 350°F.
- Using a blender or food processor, blend 1 can of black beans until mostly smooth. Transfer the pureed beans and other can of beans into the bowl with the veggies.
- Add the corn, breadcrumbs, and eggs to the bowl. Mix all ingredients together.
- Line a baking sheet with parchment paper or a silicone baking mat (number 5 in my list of favorite kitchen gadgets!).
- Form veggie bean burger balls, flatten to a burger patty shape, and place on the baking sheet. I used a 1/3 cup measuring cup to scoop out batter, and ended up with 14 patties.
- Bake at 350°F for about 18 minutes.
Notes
Recipe modification options
- To make this vegan, replace the eggs with “flax eggs”: 1/2 cup cold water, 3 Tablespoons ground flaxseed. Mix flaxseed in the water and place in the fridge while prepping and cooking the veggies and beans. The burgers may not hold together quite as well when using flax eggs in place of chicken eggs.
- Add or subtract spices to suit your tastes.
- Substitute other beans in place of black beans. Keep the same quantity – 2 cans/3.5 cups.
- Use other veggies if you prefer. Keep to about 2 2/3 cups veggies.
Cost
Cost of the veggie bean burgers depends on which ingredients are selected for this recipe, if veggies are in season when they’re purchased, etc. The below cost breakdown is based on recent prices in my local grocery stores, and the ingredients listed in the above recipe.
- 3.5 cups cooked black beans, prepared from dried beans. $1.50 for 1 lb dry, which yielded 7 cup, or $1.50 x (3.5 cups/7 cups)=$0.750
- 2 eggs. $1.99/dozen x 2 = $0.332
- 1 bell pepper (~130 grams). $3.99 for 1 lb (454g) organic frozen bell peppers. $3.99 x (130 g/454 g)=$1.143
- 3/4 cup corn kernels (95 grams). $1.49 for 1 lb (454grams) organic frozen corn. $1.49x(95g/454g)=$0.312
- 1 small-medium onion. $3.49 for 3lbs (6 medium onions). $3.49x(1 onion/6 onions)=$0.582
- 3 cloves garlic. $2.09 for a bulbs; about 6 cloves per bulb. $2.09 x (3 cloves/6 cloves) x (1 bulb/5 bulbs)= $0.209
- 1/2 cup grated carrot (45 grams, about 1 carrot). $1.29 for 1 lb (454 grams) organic baby-cut carrots. $1.29 x (45g/454g)=$0.128
- 1 teaspoon olive oil (5mL). $9.99 for 1.5 Liters. $9.99 x (5mL/1500mL)=$0.033
- 1 teaspoon salt. $1.48 for a 26 oz (737g) carton, containing 491-1/4 tsp servings. $1.48 x (4 servings/491 servings)=$0.012
- 1 cup breadcrumbs. I made from my sourdough bread, but based on current price of plain breadcrumbs at my local grocery store: $2.09 for 15 oz (425g). 1 cup = 90 grams. $2.09 x (90 g/425 g) = $0.443
- 1 teaspoon dried oregano. $6.19 for 0.5 oz (14g) organic dried oregano. 1.0 grams/tsp. $6.19 x (1.0g/14g) x (1 teaspoon) = $0.442
- 1 teaspoon cumin. $4.19 for 1.8 oz (51g) organic ground cumin. 2.0 grams/tsp. $4.19 x (2.0 g/51g) x (1 teaspoon) = $0.164
- 2 teaspoons chili powder. $4.79 for 4.5 oz (127g) chili powder. 2.6 grams/tsp. $4.79 x (2.6g/127g) x (2 teaspoon) = $0.196
- 1 pinch (~1/32 teaspoon) ground cayenne pepper. $4.19 for 1.9 oz (48.2g) organic ground cayenne pepper. 1.8 grams/tsp. $4.19 x (1.8g/48.2g) x (1/32 teaspoon) = $0.005
- 1/8 teaspoon black pepper. $4.19 for 1.7 oz (53.9g) organic ground black pepper. 2.1 grams/tsp. $4.19 x (2.1g/53.9g) x (1/8 teaspoon) = $0.020
Total cost: $4.771 for a full batch, which was 14 veggie bean burger patties for me. Thick comes out to about $0.34 per patty! Even if I eat two for a meal, this is only $0.68! For comparison, I consider a “good price” (on sale or with coupon) to be $1/patty for a store bought veggie burger. My veggie burgers cost about 1/3 the store bought ones, and to me, mine taste so, so much better!